Troubleshooting best practices for DevOps teams – strategies to recover quickly from downtime

Monitoring Board

It’s Saturday night – and your system is down, customers can’t access the application any more. And your key developers are not in reach. Sounds like a quite uncomfortable situation. Read here what you can do to prepare for such events – and recover as quickly as possible from outages and downtime events.

The usual steps to remedy problems are clear: understand the issue, fix the root cause. Sounds very straightforward. However, what if the person on call is not the experienced developer and doesn’t know right away what to do? In DevOps teams with shared responsibility and distributed 24/7 support that may happen sooner or later. To be on the safe side you need an approach that enables the people on call to remedy the most common problems without deep expert knowledge. How to prepare for that? Here are some best practices.

(1) Know the usual suspects

Chances are that this is not the first time that the service failed. That may be due to some known but not yet fixed problem, or due to some dependency to an service outside of the team’s control. Such potential “known” issues should be documented prominently, along with step-by-step instructions on how to get up and running again. Ideally this should be part of the ‘troubleshooting’ section of your runbook (see below).

(2) Provide quick diagnostics via monitoring boards

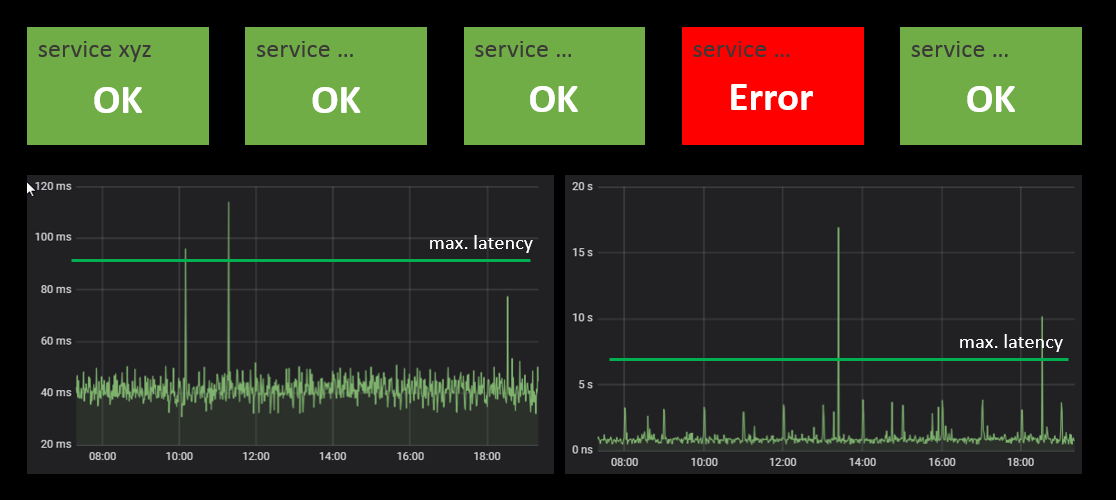
A good monitoring board is the starting point for efficient troubleshooting. Each service should have its ‘health’ board where the status of each major component is displayed, e.g. via green/red status panels. Make sure the overall situation can be perceived at a glance. Where finer grained information is available make it accessible as drill down from these panels. An example: for service latency you can use time series plots over the last few hours. For such display it may be helpful to display horizontal lines within the chart to indicate the ‘normal’ range of the value.

Monitoring Board
Monitoring Board

The board should also show the status for each required external service. This will immediately indicate if the own service or some external dependency – like e.g. a database – is the cause of the problem.

Building good monitoring boards takes time and effort. For each component you need to come up with a reliable status test. However the work will pay back sooner or later. Running production systems without such monitors is like driving a car at night without the lights on.

Grafana is a widely used open source tool for building such boards. There are also lots of other tools, including commercial systems that automatically take care of code instrumentation for health and latency measurement.

(3) Set up symptom based fix procedures

This is the most underrated approach to speed up system recovery. It will take some time and effort to prepare but will most likely provide good learnings for the team and put you in a much better position if problems occur. How does it work?

As engineers we are used to start reasoning about system behaviour from the viewpoint of individual components:

“if the database index is corrupt => service xyz will have high latency

However in an outage situation such information is not very helpful, especially for non-experts. The guys will not see the database index problem – they will see the high service latency. And they want to know what to do about it. So lets analyse the system and set up instructions that start from exactly such observable symptoms. This is how it may look:

high latency of service xyz may be caused by an overloaded database

symptom-cause-fix

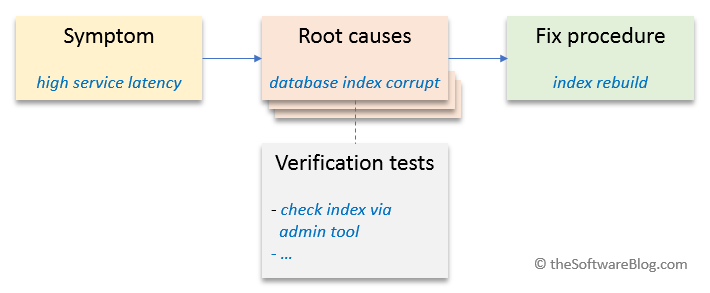
Imagine your 24/7 support had a complete list of possible system problems (symptoms) – and for each of them a corresponding fix procedure. Troubleshooting would be a lot easier. Of course there may be more than one potential root cause. Or additional checks may be required to find out which of the possible causes is the culprit.  Here’s the approach to do this analysis in a systematic way. For best outcomes do it with the entire team:

Phase 1: Problem brainstorming

  • Brainstorm possible system problems and failure symptoms
  • Ask yourself: what can go wrong and how would that become visible in system behaviour?
  • Try to make this list as exhaustive as possible

Phase 2: Assign root causes and verification checks

  • For each symptom list the possible root causes
  • If required or useful: add instructions to verify or exclude the suspected root cause – these are the verification checks

Phase 3: Write down fix procedures

  • For each root cause write down the required steps to bring the system back up to normal operation
  • If possible include verification instructions – how would you check that the procedure solved the problem?

Congratulation: you just created a troubleshooting guideline  : )

Do this exercise with the team, and repeat it every few weeks or months t o make it more complete over time – and to adapt it to modified system behaviour or new features. The troubleshooting guideline is also an essential part of the fourth best practice:

(4) Keep a runbook

Set up and maintain a runbook for each of your applications and services. The runbook contains the basic operational data for the service:

  • Name and short description
  • SLA (service level agreement or target)
  • Involved team members
  • Involved artefacts and libraries – and corresponding links to the repositories
  • Consumed external services (dependencies)
  • Build and deployment approach
  • Smoke tests (how would you quickly verify that the service is up and running?)
  • Monitoring KPI’s and strategies
  • Troubleshooting guideline (see above)
  • …and everything else that may be helpful

Keep the runbook up to date – and make sure it is easily accessible for whoever may need the related information.

And how about logging?

Logs are important, no doubt about that. However you should not rely only on logs to find out about your system’s health status. Set up monitoring boards for that purpose. And have your logs ready and easily accessible for verification checks – or situations where the approaches 1…3 did not help and you need to dive one level deeper.

Tool checklist for cloud development – set your team up for productivity

What tools are required for teams that are developing software for the cloud? Verify this checklist to find out if your team has the basics for productive software development in place.

Contents

Versioning system

You know that you
(1) have one, (2) it is set up correctly and (3) and your team is using it
… if you can answer the following questions with YES (in case you’re not sure if you need a versioning system read here)

  • Each team member is able to revert source code to a former version at any time.
  • You are 100% sure that this works because you have tried and tested it
  • You are able to quickly find out what has changed between versions
  • You are treating configuration files, documentation and any other artifacts like your source code – everything is under version control
  • Team members check in modified source code at a regular basis
  • Your team has agreed on a common branching strategy
  • If your versioning system would fail completely today there would be no panic. You would just set it up again from scratch and reload yesterdays backup. You know that this would work because you have tested it at least once.
  • If yesterdays backup was not created there is a notification in your team mailbox

Issue tracking

You know that you
(1) have one, (2) it is set up correctly and (3) and your team is using it
… if you can answer the following questions with YES (in case you’re not sure if you need an issue tracking system read here)

  • The team has a complete list of all currently known bugs and issues
  • The list is accessible to each team member and everybody is be able to work on issues (e.g. add comments)
  • Each team member can see “his/her” issues with one single click, and ideally get automatically notified about status changes for “his/her” issues
  • The team has a clear policy on issue status management: what issue status values exist and who is allowed to change issue states? An example: many teams follow the principle that an issue should be verified and closed by the person who initially opened it. Your team may want to handle that differently – just ensure that everybody agrees on the same standard.
  • Each issue in the list has at least:
    • a clear title and a description that each team member can understand without need to ask whoever has written the issue
    • a status and an owner within the team
    • additional information required to tackle the issue (screenshots, steps to reproduce, logs etc.) and meta information that helps to manage the issue and understand its history (time created, component or service concerned, version, …)
  • Daily backups are created and stored on a separate system. The backup / restore procedure has been tested at least once. This is not required if you use the cloud service of some provider (see article)

Build and Deployment System

You know that you
(1) have one, (2) it is set up correctly and (3) and your team is using it
… if you can answer the following questions with YES (in case you’re not sure if you need a build / deployment system read here)

  • Each developer can create a new build with a single command or click
  • Build status is visualized and team members get notified about build problems
  • New builds can be deployed to the desired environment with a single command or click (at least for the productive environment most teams will set up rules regarding who and when this is is allowed)
  • You can always tell which version is installed on what environment
  • You have a track record of builds and deployments

Team Collaboration and Knowledge Base

You know that you have what you need if you can answer the following questions with YES (in case you’re not sure if you need tooling for team collaboration read here)

  • Each team member can access a common system and find the most relevant 5 documents via direct short link
  • Each team member can add or modify content 
  • Each team member can search for information or documents via keywords

Check out these related articles:


The new developer Onboarding Checklist

Ensure a smooth and efficient start of your new team member so he/she feels comfortable and can contribute to your teams’ results as early as possible. 

4 weeks before day one

Plan for a place within your office and verify that the basics are there (desk, chair, power supply, network…)
Order required equipment:
– notebook + docking station
– keyboard & mouse
– LCD monitor
Depending on your company: order ID card(s) and organize whatever entries in your company systems may be required (company ID and directory, email, etc.)
Block time in your calendar for day one. You should have enough time to look after things, introduce the new team member and go through the onboarding plan together.
Block another hour 3 days after day one.

1 week before day one

Make sure ID card and equipment has arrived and is complete.
Depending on your company: have notebook set up with your standard enterprise applications
Prepare the onboarding plan – what will your new team member need to know about your company (you can find a template here: [*]). Make sure to review that plan with the team.
Sit with the team and plan the initial assignments during the first 2..3 weeks. Make sure to leave enough room for startup and learning.

DAY ONE

Take some time to chat and introduce the new one to the team
Explain your companies’ basics – where is the coffee machine, what are the usual office hours (if any), how to you handle work from home, overtime, holidays, business travel etc.
Explain your work context – what is your groups position within the company, who are your customers, what are your interfaces. You have covered some of that during your hiring interview (see [*]) already.
Give a broad overview of the new ones’ role. Maybe leave the details for later. Go through the onboarding plan together. Hand over that plan – your new team member will own it from now on.
Note that onboarding is not done after day one – It is a process that takes much longer

3 days after day one

Now that the dust has settled take some time to discuss what has been happening so far. Answer questions. Are there any issues to solve? How does the new position feel like? Talk about the role and why it is important. What the major success factors? Why does your group exist? What is the new one’s contribution to that?
Fix a date for the next follow-up meeting 3…4 weeks later

3…4 weeks after day one

Collect feedback. What is good? Any help needed? How’s the team? How’s the work context in your place compared to the new one’s past experience? This is also a learning opportunity for yourself.
While you sit together write down 2…4 high level goals and/or desired outcomes. Focus on goals and outcomes, not on tasks. E.g. “ensure that the developed services are highly available” is something concrete and tangible, it could even be measured. You’re not doing this to control and measure but to ensure a good mutual understanding, and to get priorities clear.
Explain your approach for ongoing communication and follow-up on this exercise. Fix a meeting for 3…6 months in the future where you will review results, give credits for achievements, talk about experiences and expections, improvement potentials or whatever needs to be adressed outside of the day-to-day work context. You can find a template in the download section.


Check out these related articles: